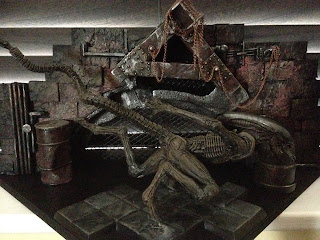
While the third Alien film has always
been a problematic guilty pleasure of mine, I've always maintained
that the creature design was the standout highlight of the whole
franchise. After James Cameron's unceremonious decision to not call
back Swiss surrealist H.R Giger, whose seminal monster design in the
first Alien film helped elevate it into movie legend, director David
Fincher reached back out to the artist for his take on a more
animalistic beast. While the creature in Alien 3 may not entirely be
Giger's own, the surrealist definitely helped to shape the monster
into what was seen on the screen; a slick, quadrupedal thing. This
time, born of dog (or ox, depending on which edit of the film you
watch) the bio-mechanical styling had been dialed back in favor of
a more naturalistic bone-and-sinew aesthetic, while the phallic domed
head also returned. It is, in an odd way, a thing of horrific beauty.
Anyway, my youngest son (with a little
help from his mother, I'm certain) bought me the NECA figure of the
aforementioned Dog Alien for Christmas. NECA may make beautifully
crafted figures, but read any review and you'll see that craft is
somewhat let down by the way they are put together. Sadly mine was no
exception, and straight out the box my wonderful new model was
missing a shoulder blade. This led to a debate with the seller, who
eventually credited me with a free replacement. This still left me
with the damaged figure, and an unusual opportunity to try my hand at
some amateur modifications. The NECA toy, as articulated as it is, was
not designed to be put on all-fours, which seems odd seeing how it
spends most of the film in this way; the legs do not bend in on
themselves, and the neck and skull don't lift enough. The end result
is an alien left staring at the floor, looking like its in the throes
of an unusual yoga pose rather than running on the heels of its next
victim. So I resolved to force this damaged figure into a dramatic
running pose and re-base it. The following is what came to pass...
First I assembled a few items; polystyrene, garden mesh, straws and some of my oldest son's old toys. I used the polystyrene as a wall, which I hoped would act as the backdrop for the alien. I pinned some of the garden mesh to the back to act as type of metal grill or fencing. The purpose of the backdrop is not to be anything specific, just to hint at the sort of backdrops from the film; bricks, pipes, chains, etc. Wallpaper cut into squares and mounted on card were used to replicate the look of uneven bricks. After applying the decorative touches I coat the backdrop in black. The base is, funnily enough, a leftover from a plastic Alien 3 model kit. The alien itself broke long ago, I held onto this for some unknown reason. I paint it concrete grey and give it a black wash. Here you can see a the hand of the Alien figure, used for scale.
I use a number of browns and grays on the brickwork, and a combination of gun metal and silver paint on the pipes (formally drinking straws) and metal-work. The canister was an old plastic toy, repainted. I used a silver paint to make the thing looked scratched, and a black wash again to make it appear suitably grimy. Again, the scaffolding was another toy. I gave it a similar treatment to the canister. A fine bronze chain is also applied and left hanging irregularly, again to hint at the type of imagery from the film.
Next I take the alien figure apart, stripping it into its individual components. I discard all the joints, as when in place they don't look particularly natural and only elongate the limbs. I take some time to play with these, and to work out the final pose. The tip of the tale was crooked from how it was packaged clumsily, so I used Milliput to straighten it. This is mostly successful. Clay failed to hold the limbs together, so I'm forced to splash out on more expensive modeling putty. It works, but keeping the thing together while it sets presents issues. Finally I manage to balance it on a combination of household items. Amazingly, and by pure luck, the thing actually balanced on its own without being propped up.
I examined a number of photo references from Alien 3, film stills, behind the scene pictures and other models and figurines. The colours seemed often contradictory, and the sepia lighting of the sets often just bathed everything in a brown hue. Finally I opted to begin with an olive green base coat. The second coat of paint was a tan brown, although I'm sure not to coat the thing entirely, so in areas the olive green still breaks through, especially on the fleshier parts. I base the backdrop (which couldn't support its own weight) onto a piece of MDF. It's cut so that it's wide enough for the whole wall, but cut into an angle that should compliment the alien's base. I add further highlights to the ribs, spine, shoulders, teeth, tongue and lips. I also use modeling putty to fill in the gaps between the dome and lips, and use black paint on each end of the dome.
... All in all, coming along nicely.


No comments:
Post a Comment